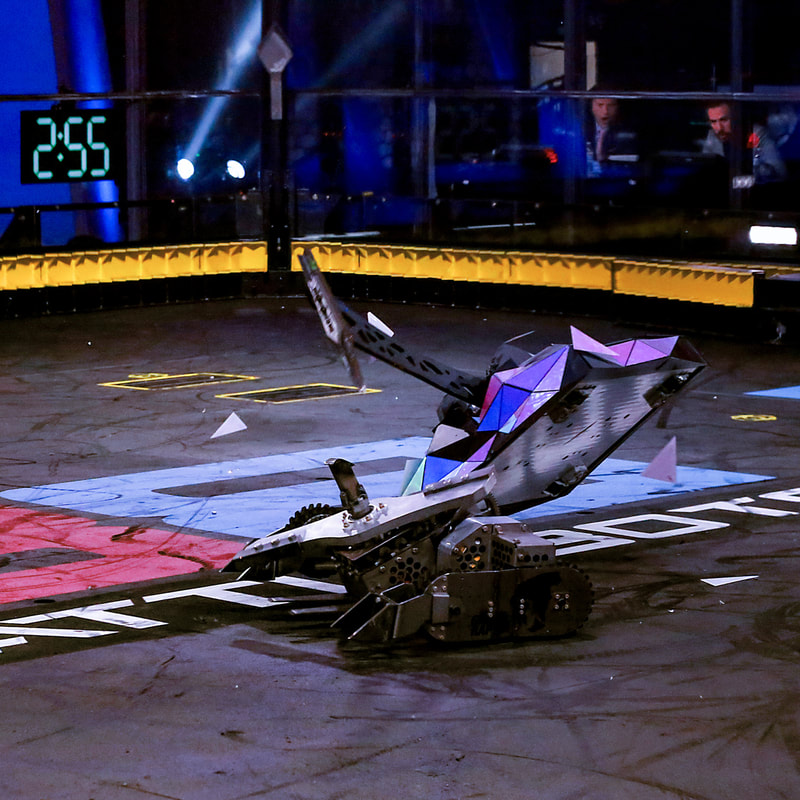
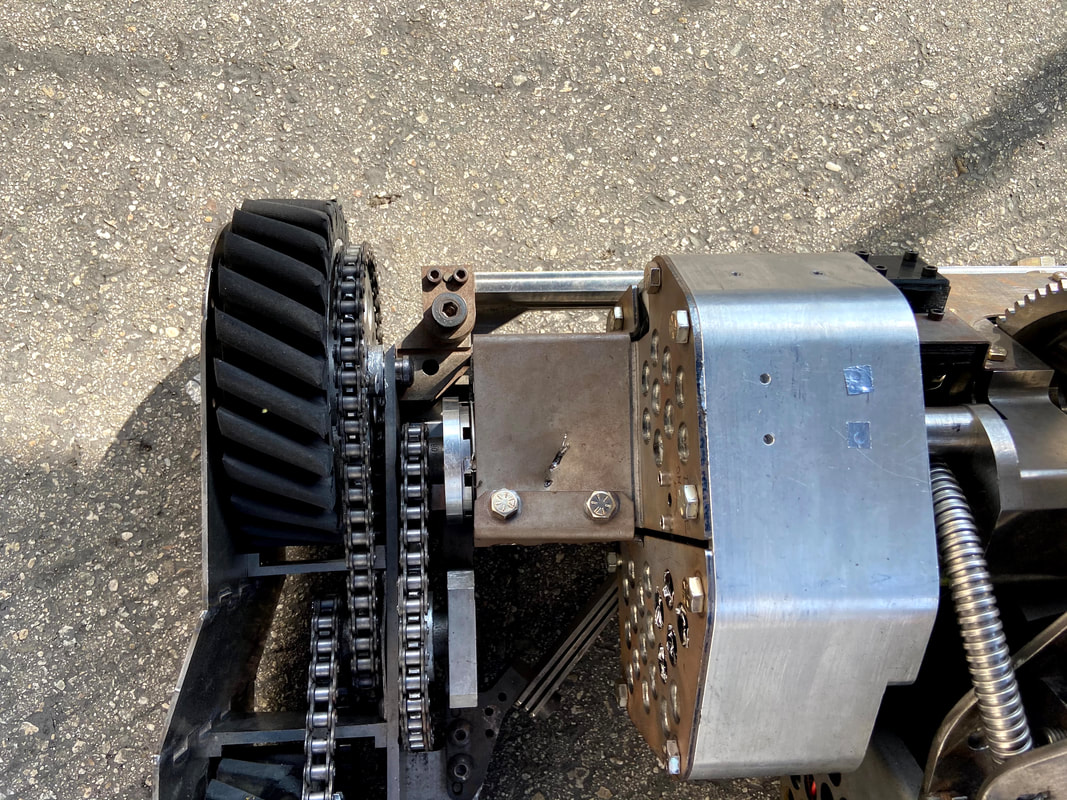
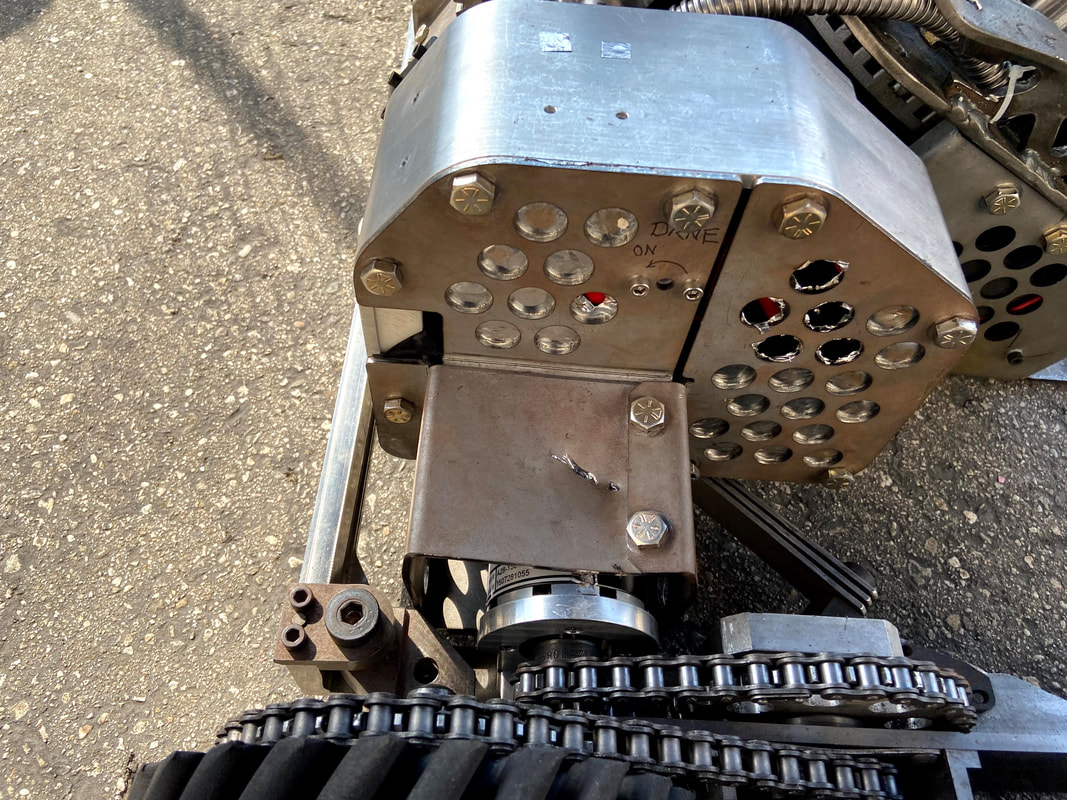
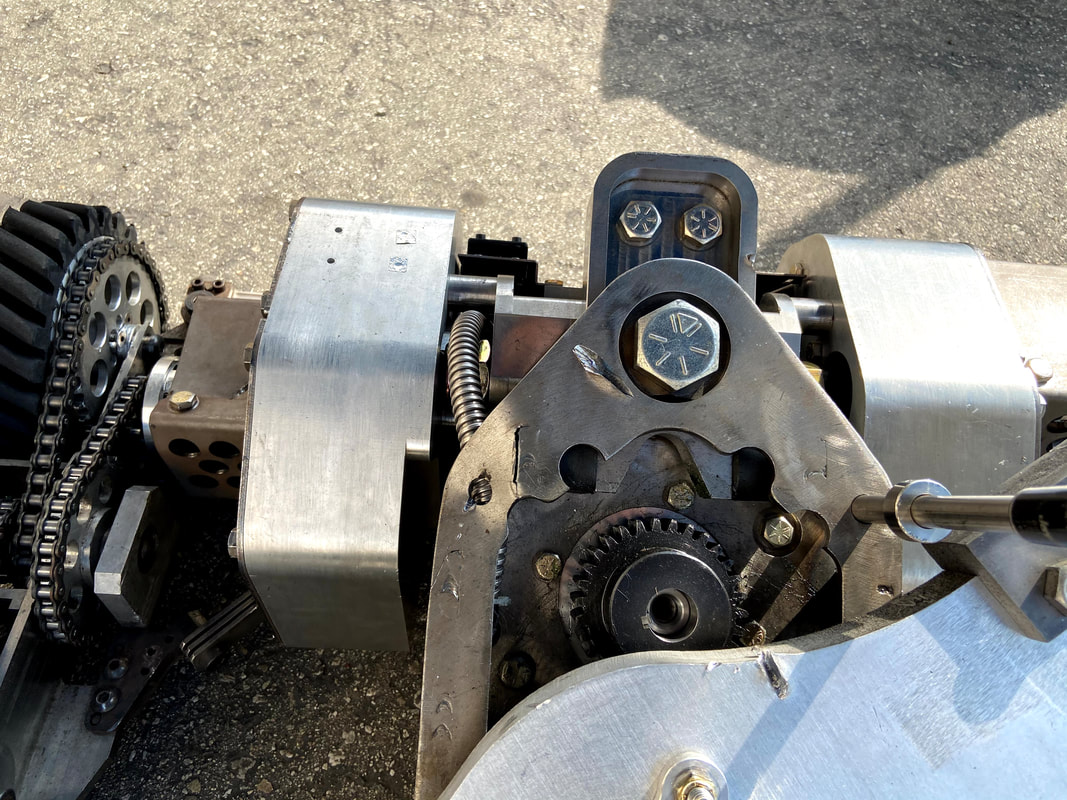
 For our first fight of the 2020 season, we were excited to be matched up against a returning veteran team, and former semi finalist, Ghost Raptor! We were the first fight of Season 5 Episode 2, and if you haven't watched it yet, go check it out! Spoilers ahead in our post fight report, you've been warned! Ready? Hit the jump for the full post-fight breakdown! 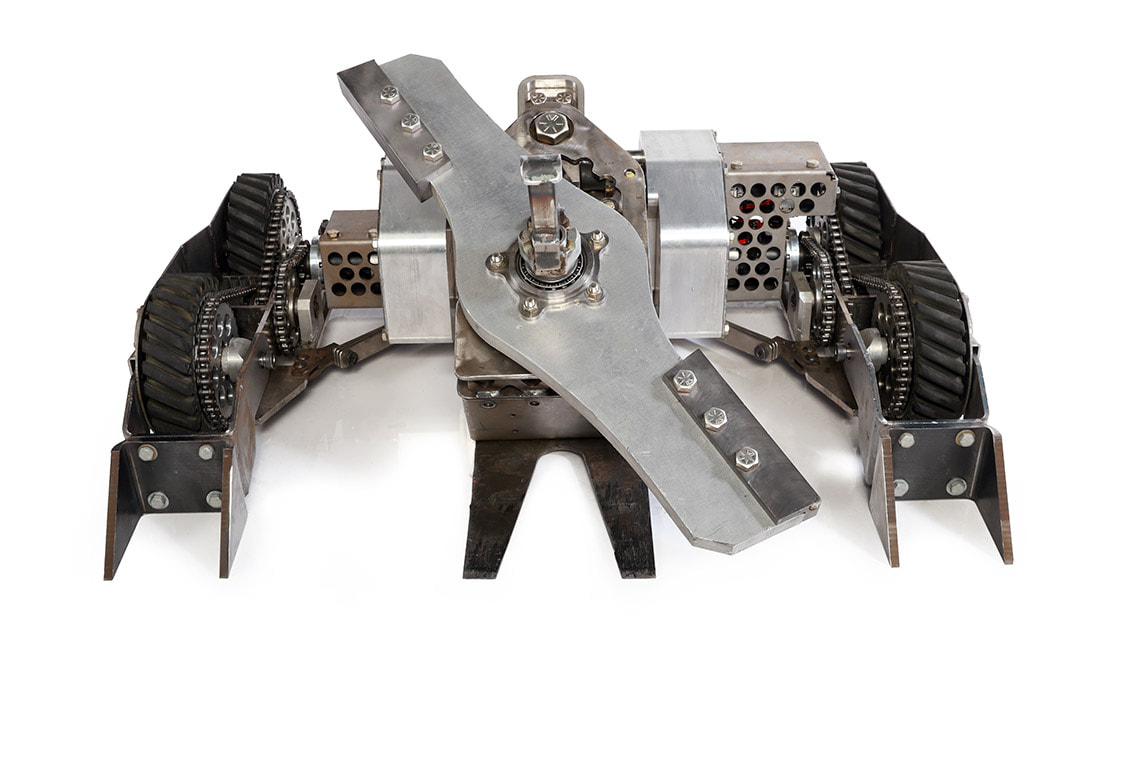 Ghost Raptor has a big horizontal spinner on the front, which we have prepared many things to counter. Check out this video for a quick overview of the pre fight setup, and keep reading for an more in depth explanation of pre-fight setup, before we dive into the fight itself. This being our first fight of the season, there are many new things to go over. The first thing we did when we found out we were facing Ghost Raptor was switch to our anti-horizontal configuration. This is similar to our configuration from last year, with a few changes. It consists of a solid front UHMW ablative armor component, and a titanium wedge behind that. This will replace the fun prongs we had on the robot in our official 2020 photo, so I guess we'll need to wait a bit to whip these out: 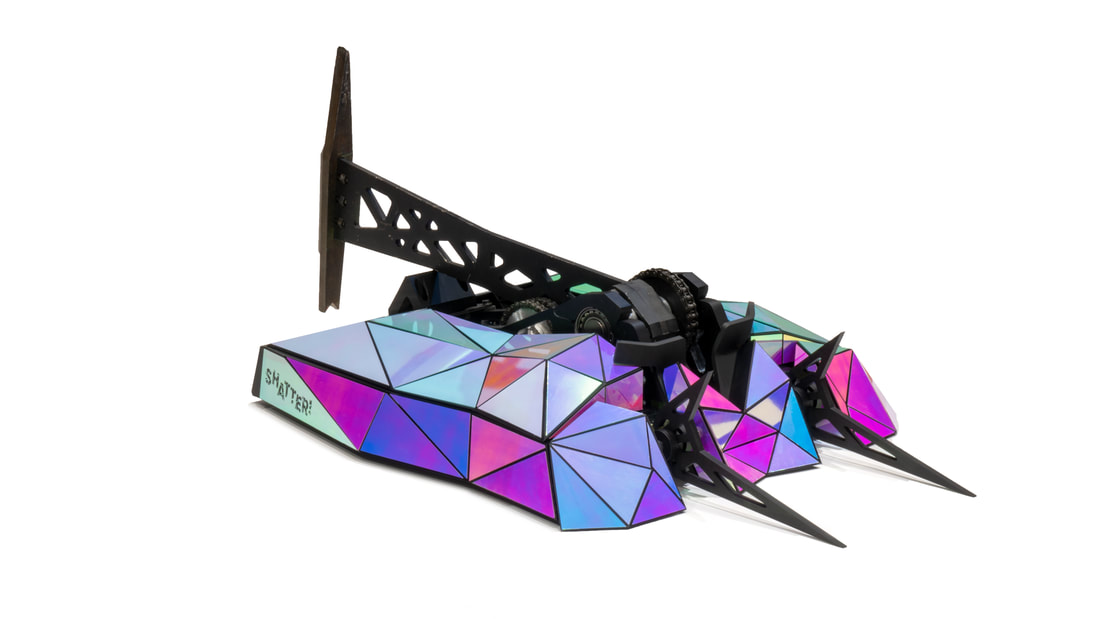 Instead, the front looks like this for horizontals (we don't want our prongs getting ripped off): 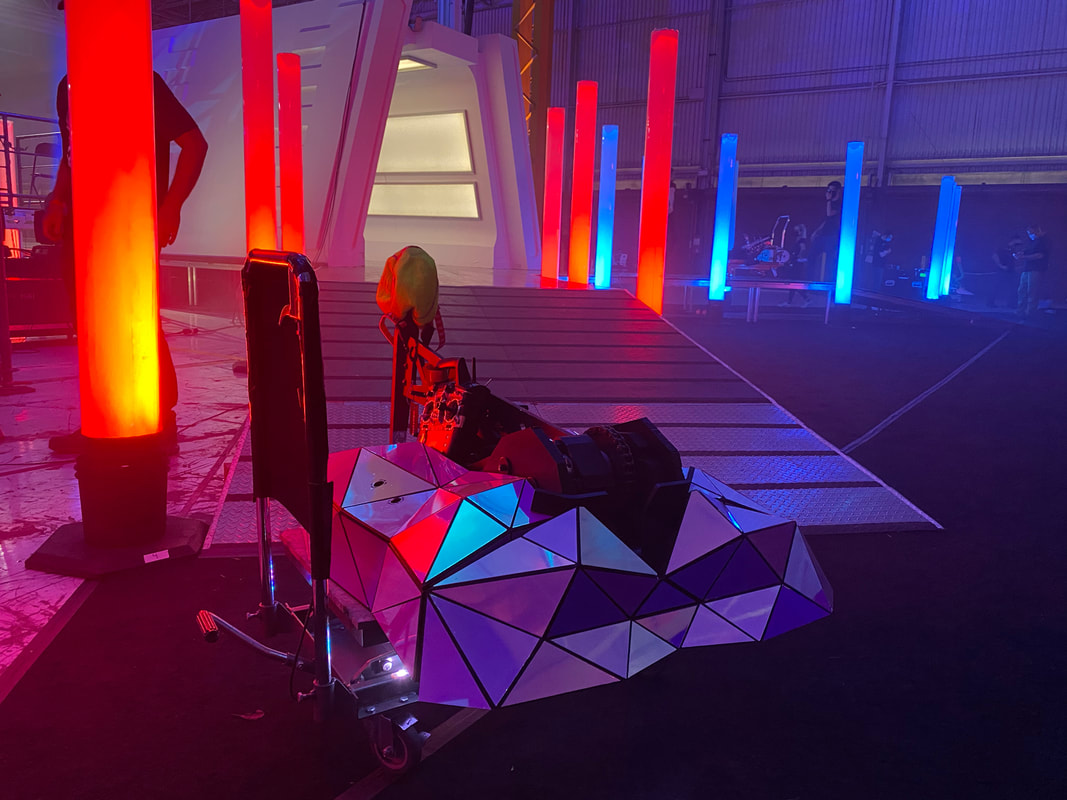 Big, chonky, solid front. Notably, in this configuration you'll notice the titanium wedge does NOT stick out the sides. Last season we had some titanium protruding from the side of the ablative armor. The idea was that this hard surface could deflect horizontal spinners upward. After Minotaur was able to catch that corner in our fight in 2019, we changed our strategy. By only having plastic, there is nothing for the spinners to catch. Any exposed metal is at risk of being "caught," especially at the corners, so we've removed it. Note in the photo below of 2019 Shatter! (in the anti-horizontal configuration) you can see the titanium poking out the side (it's painted black). 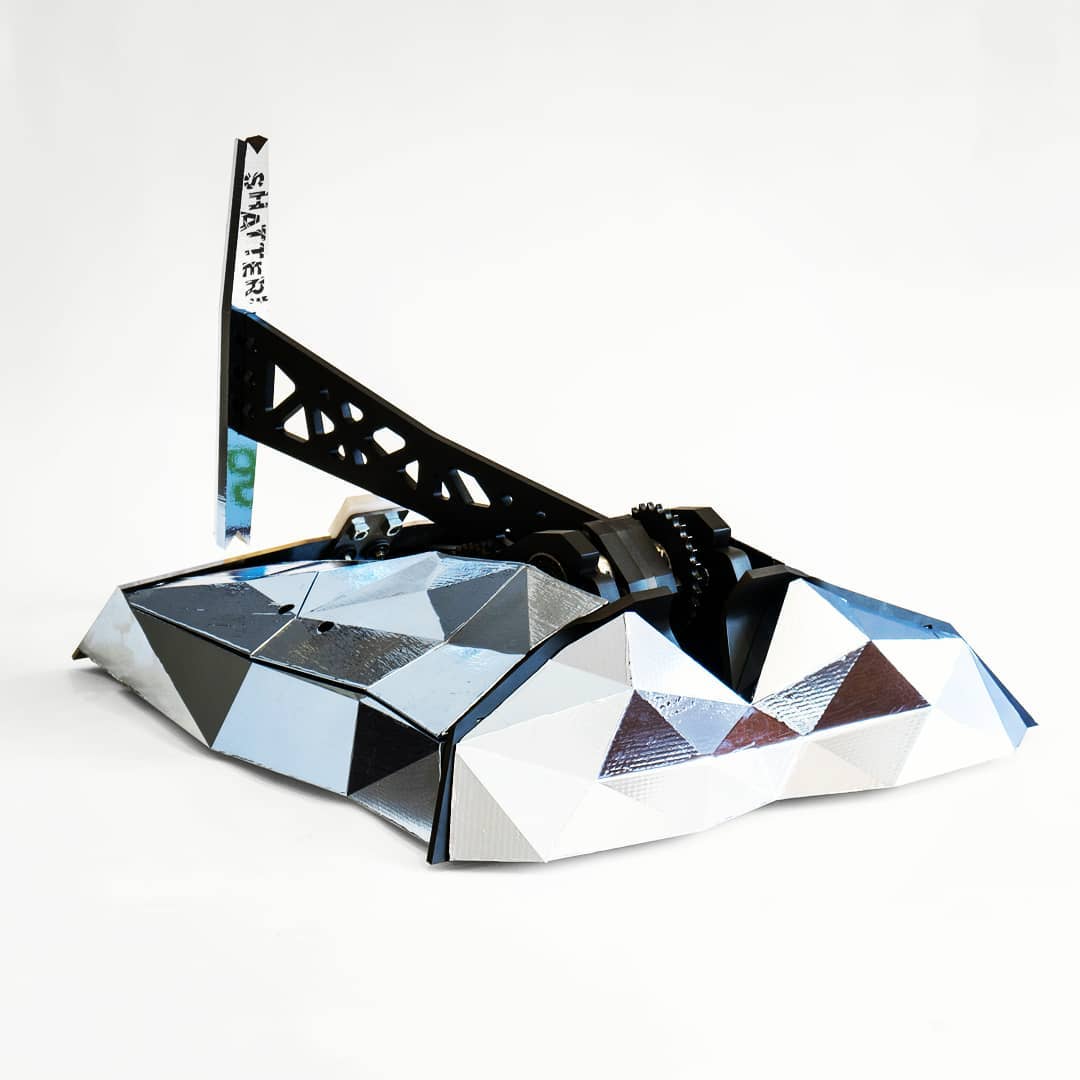 We still have titanium covering the front of the robot behind the ablative (see below), it just doesn't poke out the sides, and is inset a full inch from the side of the robot. It's also separated into 3 pieces now, making the front more modular. 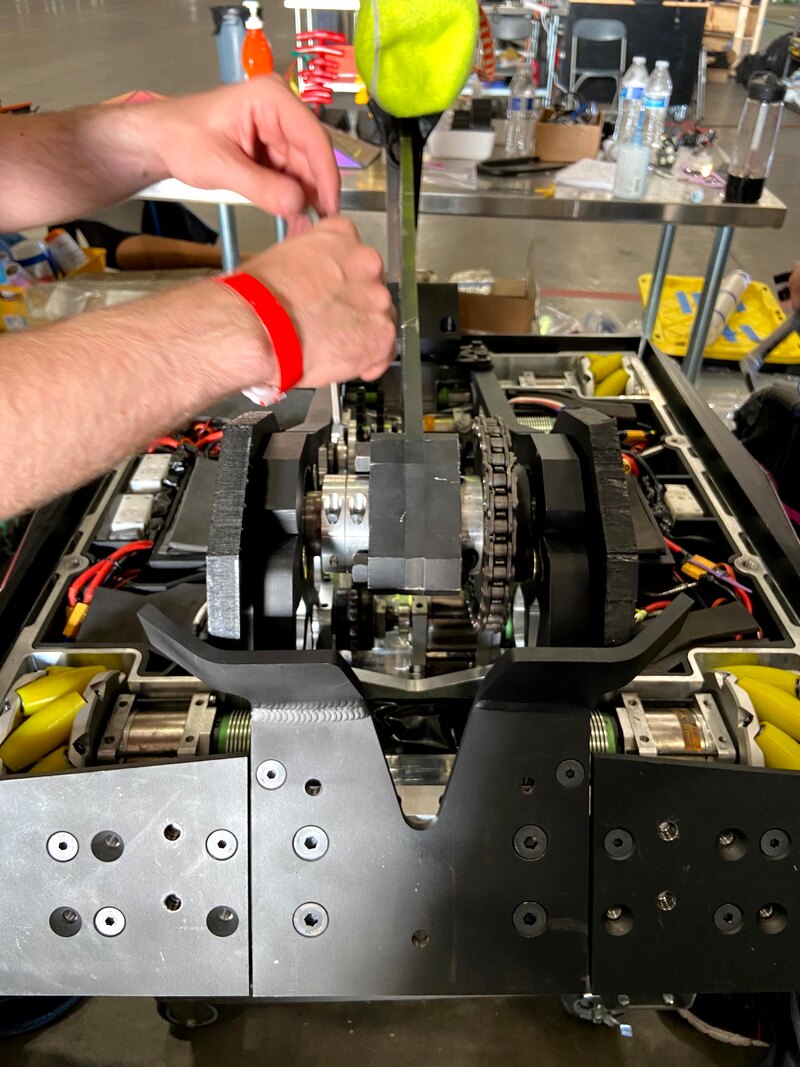 So, a standard anti-horizontal setup on the front, but what else? This season, we have a selection of both arms and hammers. We have two different arm lengths, and 3 different hammers. For going against a big horizontal like Ghost Raptor, we decided we wanted maximum reach for some ranged attacks, so we went with our longer arm. We also wanted to make sure we delivered as big a hit as possible to the weapon, so we used Ol' Rusty, our largest and most powerful hammer. Below you can see this year's arms hot off the waterjet, and just how much shorter the shorties are. We'll need to wait and see how those work out in a future fight. 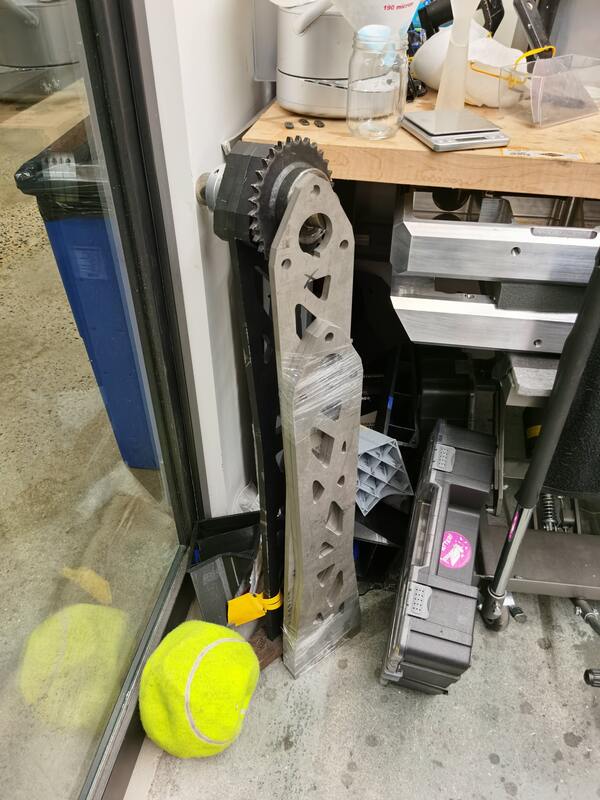 But Ghost Raptor isn't just any horizontal spinner. Ghost raptor is perhaps one of only 2 horizontal spinners that can actually hit our weapon directly at the axle. Most horizontals are designed to hit low on the frame, while Ghost Raptor and Rotator are designed to hit up high. This means we had to make a quick adjustment to add extra protection to the sides of our hammer axle, just in case. What we settled on was 1" of solid UHMW which mounts to either side of the hammer assembly. There is a slight air gap, which allows the whole piece to bend/flex to absorb hits, in addition to UHMW's ability to tear and absorb blows as well. Here's some super slow mo of me hitting the assembled piece with a sledge hammer: 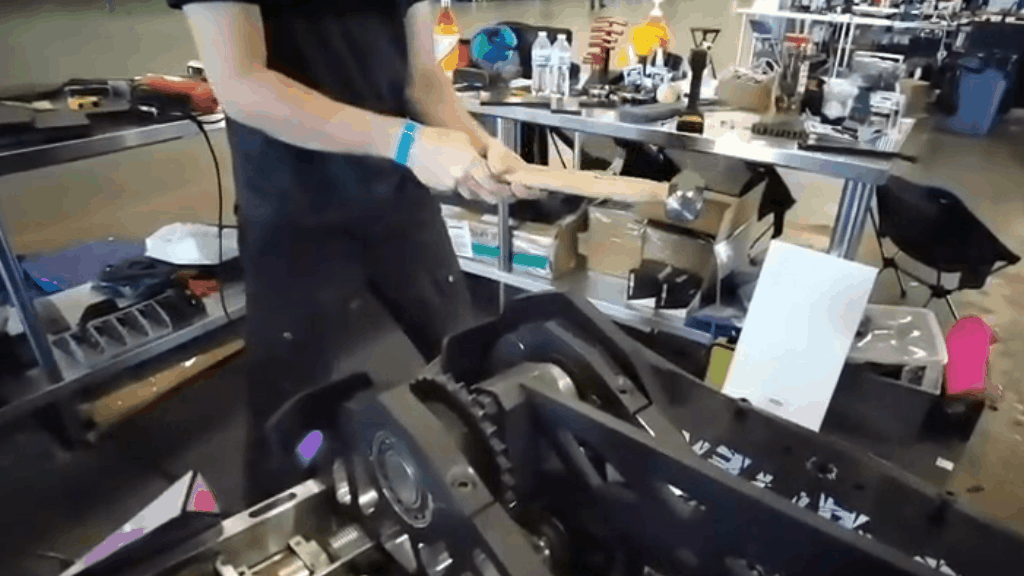 I can't hit as hard as Ghost Raptor, but this is significantly better than directly hitting our bearing assembly with a sledge! Note also the care we took in making sure these were still faceted to match the rest of the robot! Aesthetics are important, ha. We have one last decision to make before the Ghost Raptor fight - and that's how many magnets to use. Yes... we have magnets this year! Surprise! Here's us fooling around with some of our smaller magnets on an old piece of UHMW from last season. Note, that they are interacting several inches away from each other! These magnets are no joke! You need to be very careful with them, as they will immediately snap to each other, or any piece of metal, put even many inches away from them. These are enormous rare earth magnets. Many people have tried magnets in the past, and even this season Beta is using a large electromagnet. However, we don't want to turn on/off the magnets - we want extra downforce all the time to help us get more traction on our omni drive (in addition to limiting our hammer hop). Shatter! 2020 has magnets mounted to the bottom of the billet, inside aluminum protective housings (both made by our awesome sponsor Prismier!) at all four corners. Below you can see one mounted next to our front wheels: We mounted the magnets close to the wheels to minimize the risk of pulling the floor up off the floor or even potentially flexing the floor. In this way, we pull the floor directly into the wheel. There are real risks with these magnets, as each magnet has the potential for hundreds of pounds of downforce. Inside the housing, we have the ability to raise and lower the magnet about 1mm to adjust downforce. We also have the ability to run disc magnets, or square magnets - the square shape is more space efficient and powerful. Lastly, we have extra magnet mounting places up front - meaning we can have a total of 6 magnets - one by each rear wheel and 2 by each front wheel. More magnets in the front means less chance of a hop too. There's a twist though, we're aren't allowed to test our robot in the official battlebox. In case you haven't heard, they've upgraded the floor to 1/2" thick solid steel from previous years where it was multiple layers of 1/8" steel. This new steel is great for magnets - but it's hard to find large expanses of 1/2" solid steel to drive on to test our settings. The test box has only 1/8" steel floors (which are extremely not flat) meaning we can't get a good idea of driving dynamics in the test box either. We just have to guess. By our calculations, using the maximum amount of the largest magnets, set at the closest distance for maximum downforce, we would have over 1000 lbs of additional downforce on the floors of the battlebox (even accounting for things like paint thickness, etc). This is a lot - and it could have unintended consequences (like blowing out our drive, catching on things, etc). Beta infamously was unable to move due to it's magnets back in the Comedy Central days of BattleBots. In order to play it safe, we went with 4 of the smaller magnets, mounted at maximum distance for the least amount of evenly distributed downforce. We believe this made the robot weight the equivalent of about 500 lbs in the Battlebox. Of course, pull force drops off extremely fast with distance - you only need to "pop" the magnets for the robot to go back to 250 lbs effective weight. It did make weigh ins (on the steel scales...) fun when we had to pick up the robot after, though. A good workout! Will we be the first HW to successfully use magnets to increase drive power and pushing force? We'll see! Ok, with pre-fight prep out of the way, on to the actual fight... 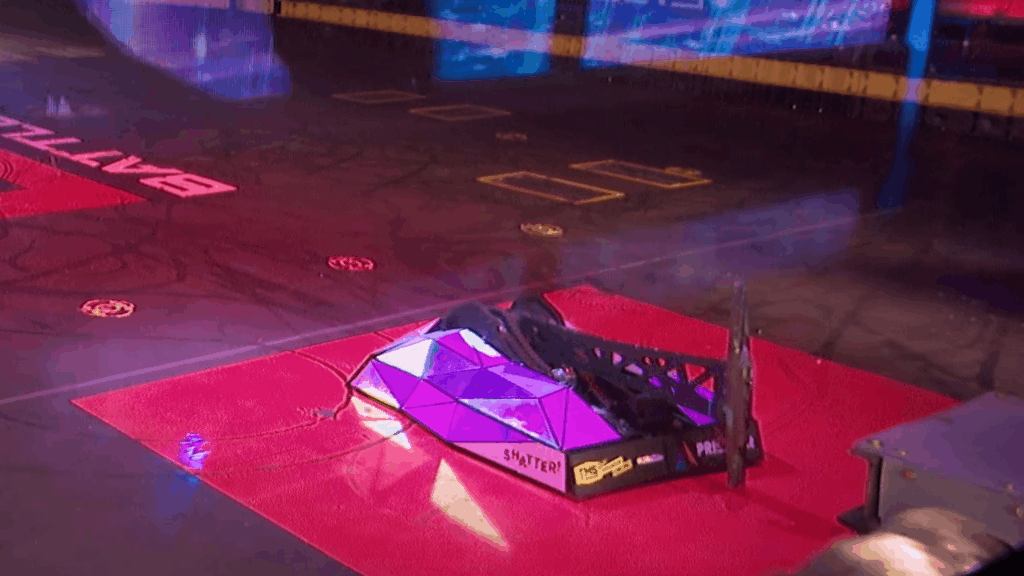 I lied, one more thing to talk about from the pre-fight intros before we get to the fight itself. We've received a lot of questions asking about the triangles: what are they? how are they attached? were they supposed to come off? who cleans all that up? First: the triangles are purely aesthetic. They're intended to come off... but not quite so quickly (and especially not all of the sponsor logos!). I want to be clear too: the triangles are not the ablative armor. The triangles are decorative, the UHMW underneath is the armor. Now, why did we make these triangles when we didn't have them last year, and why did they come off so quickly? One of our big goals this year was to figure out a way to maintain our aesthetic, while also attempting to make the ablative armor appear less damaged. Last year, we had a real issue with the UHMW plastic and vinyl looking extremely damaged when we came out of fights, look at this from our Witch Doctor fight: 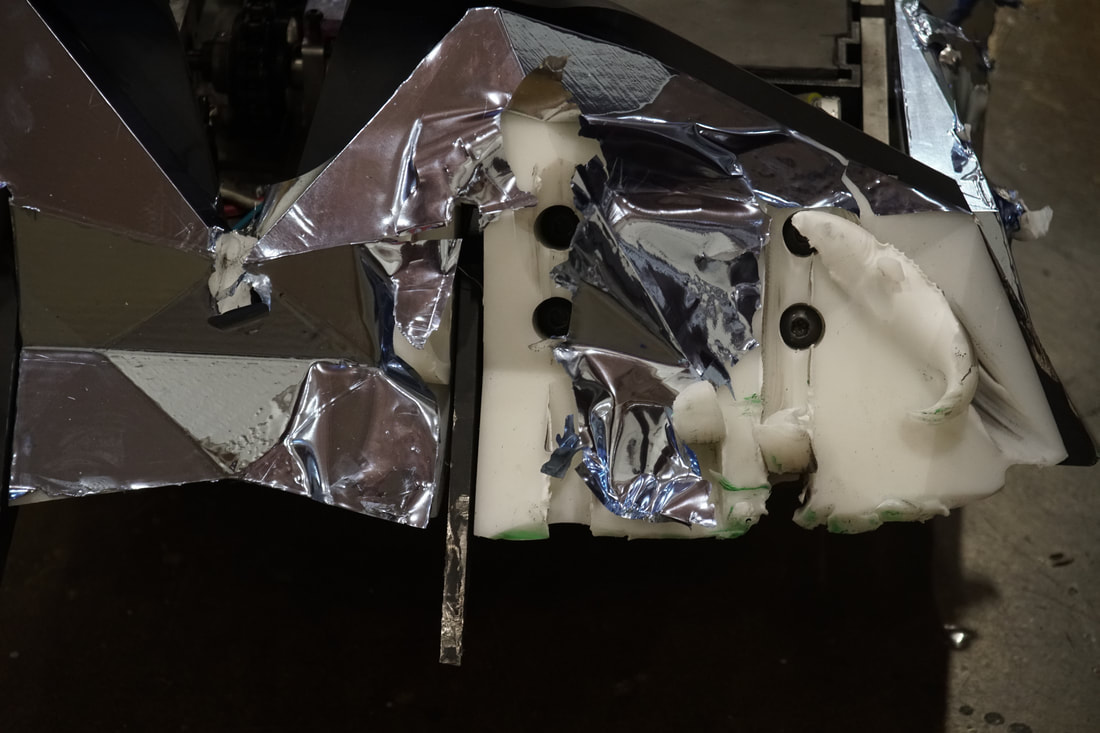 That looks terrible! But really it's not so bad. What you have is this crinkled up vinyl reflecting the light looking like broken sheet metal, and white UHMW contrasting it with it. The white UHMW is casting all sort of shadows making it look even worse than it is. For this season, we switched to black UHMW. Right off the bat damage to solid black plastic will look better than damage to solid white plastic. But that doesn't solve the issue of reflective vinyl looking extremely damaged at even the slightest touch. We can't get rid of the vinyl either - paint just does not have the same effect, it needs to be mirror vinyl. So to solve the tearing issue, we switched up the vinyl application method. Last season the vinyl was mounted directly to the UHMW. It didn't stick well, and peeled easily creating those crinkles. This season we lasercut 78 individual acrylic triangles and mounted the vinyl to them instead (we also found a way better color of vinyl!) This was ridiculously time consuming, but the end result is really awesome looking: The main purpose wasn't looks (although I'd be lying if I didn't say that was part of the reason we went with this method). The main idea here is that the vinyl sticks really well to acrylic, and with the acrylic triangles each being individual pieces they'll simply come off instead of tearing. By leaving behind only the black UHMW, without any torn and wrinkled shiny vinyl, our thought is that this will make the robot itself look less damaged - and hopefully this could help us win some judges decisions. All we need to do is make sure the vinyl is adhered to the acrylic better than the acrylic is adhered to the UHMW. This isn't tough, since the vinyl sticks really well to the acrylic and it is nearly impossible to get anything to stick to UHMW. So, they're intended to come off - on big impacts. We figured a few would come off at the start... but I guess we didn't have the triangles adhered to the UHMW as well as we first thought (hey, it's hard to get things to stick to UHMW!). At least it was hilarious and made for some good TV! For this first fight we actually used a very special (read: expensive) type of 3M VHB double sided foam tape to adhere the triangles - it was specifically designed to stick to UHMW and other low energy plastics. As it turns out, hot glue actually works way better, so that's what we ended up using for future fights. Sometimes it's best not to complicate things I guess, ha. Hot glue can keep them (mostly) on during hammer fires, while still coming off on direct impacts from opponents (a good thing). As for cleaning them up - the wonderful "crewbots" (as the arena crew is called) reset the arena after each fight, which includes sweeping the floor. The triangles are fairly easy to sweep up, and they made sure to return them to us after the fight (yay!). They don't cause any arena fouling issues, so it all ends up working out. With that out of the way, on to the fight, for real! Our strategy for this fight was to come out swinging, using ranged attacks to hit their weapon without their weapon hitting us. We wanted to disable their weapon as quickly as possible, and then continue attacking their exposed components. Ghost Raptor is a really cool robot built by an experienced team, but like any robot it is not perfect. We saw two weaknesses we thought we had a chance to take advantage of: we thought the weapon was susceptible to shock and may break if we hit it correctly, and there are many exposed chains and such when attacking from overhead. If we could stop the weapon then there was a lot we could hit which would normally be protected by the spinning blade. So, let's see if we can stop the blade. 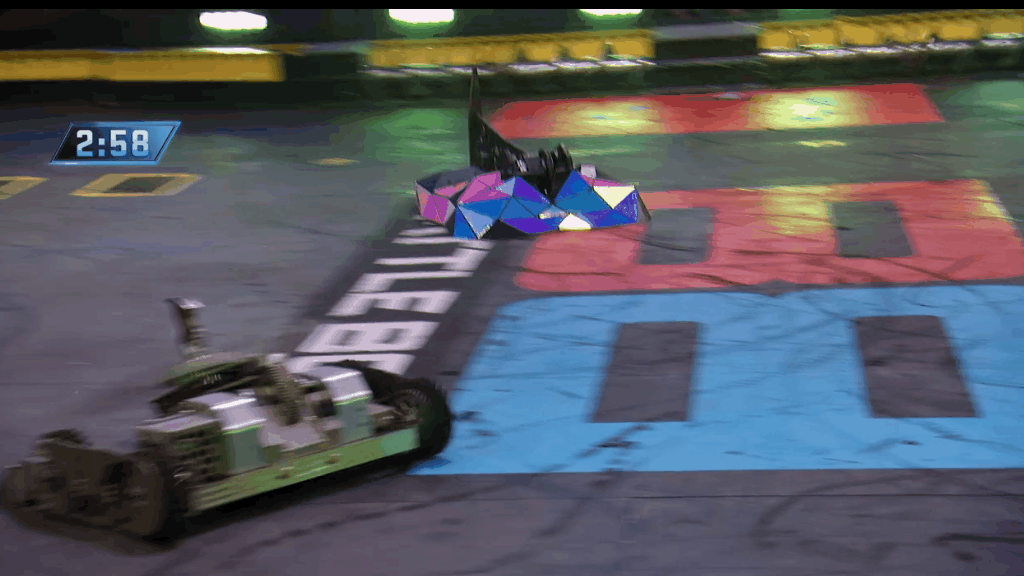 We had our first hammer hit 4 seconds in, and that was it. Their weapon never spun up again after this hit. As an aside: I love this view of the robot sliding sideways. You can really see the advantage that the omni drive gives us here, allowing us to keep the hammer pointing where we want and maneuver into exactly the right spot for the hit. People may say these types of hits are luck, but this is exactly how we designed the robot to work and exactly how we planned that first impact to work out. The triangles shattering off on this impact is also just really cool haha. Just looking at this clip above, you can see the magnets seem to have a bit of an effect here as well, as the robot is noticeably snappier in its driving than last season, allowing me to more quickly change directions. With Ghost Raptor's weapon down we could swing away aiming for their now exposed components from above. As we keep watching the fight though, we see a bit fly off of Shatter, actually launching off during a hammer swing: 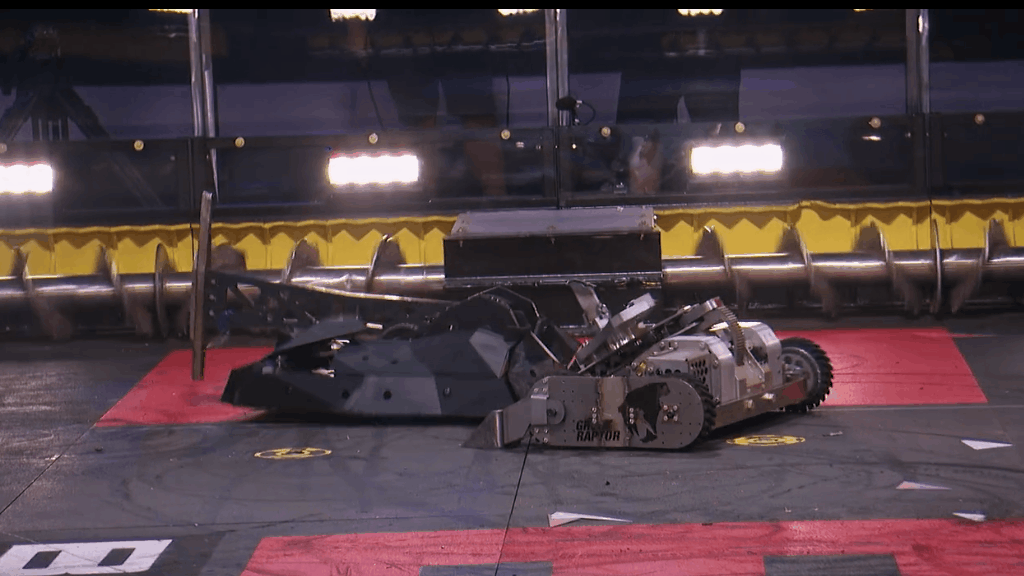 ::insert WHOOP sound effect:: The robot is covered in lots of all-black faceted chunks of plastic, but not all all-black faceted chunks of plastic are created equal. The front, sides, and rear of the robot are covered in solid UHMW PE plastic. This is our famous ablative armor. The tops are hollow PLA 3d prints. If you know anything about PLA, you know it is definitely not HW combat robot armor. The faceted tops are there to hold the triangles in place and keep the robot looking like a complete faceted shape. However the faceted tops are not armor - they are decorative. In fact, we actually weighed 252 lbs for this fight - we used 2 lbs of the "decorative" 10 lbs weight allowance, which required pre-approval from the Ghost Raptor team. I'm not sure if anyone else has ever actually used the 10 lbs decorative weight bonus before us. Anyway, the actual top of the robot is underneath, and is a flat panel of 1/2" thick UHMW (we can add more if needed): 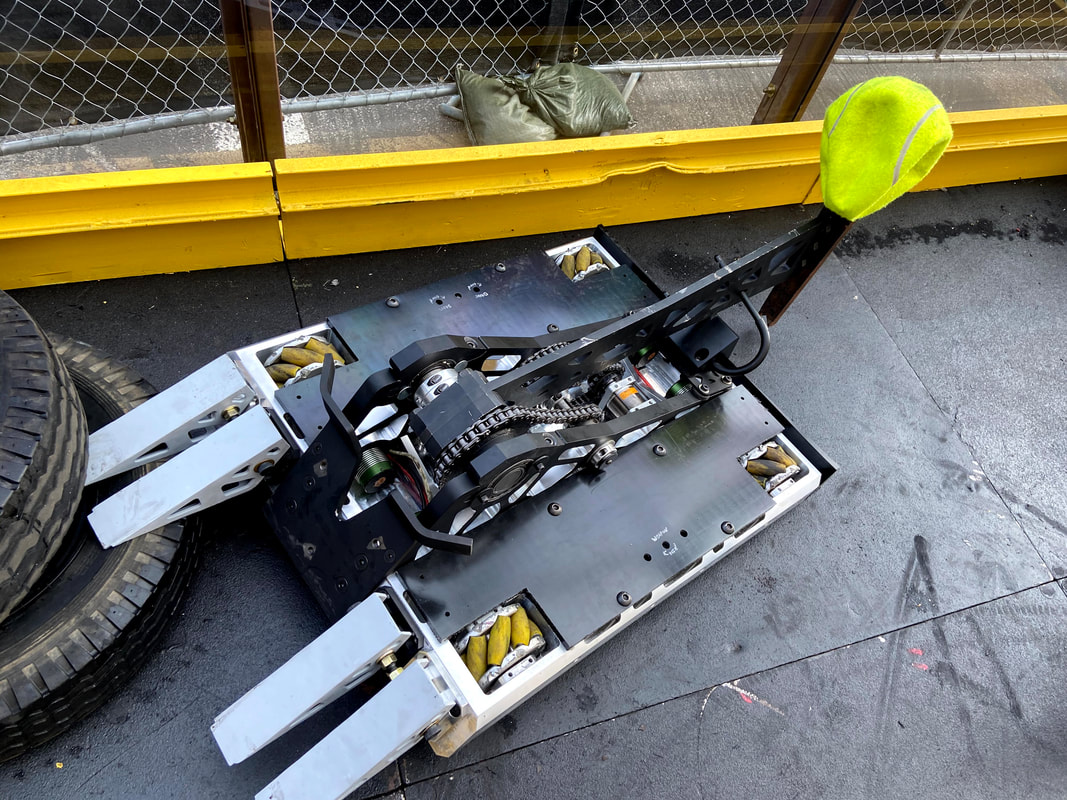 Pictured: Not Bite Force. The faceted top panels are attached via velcro - designed to be quickly ripped off if we need to reach the actual tops in a hurry for any reason (ie: battery/electronics fires). This quick-release capability sometimes activates itself during a fight - but these panels are purely decorative and it's not an issue when they come off. As we keep going, we see that Ghost Raptor has a powerful lifter, and is able to lift us and pop our magnets. With our wheels off the ground, Ghost Raptor is able to get some good pushes in, but never quite flip us over.  As we keep dancing around each other, we continually land blows into vulnerable parts of Ghost Raptor. 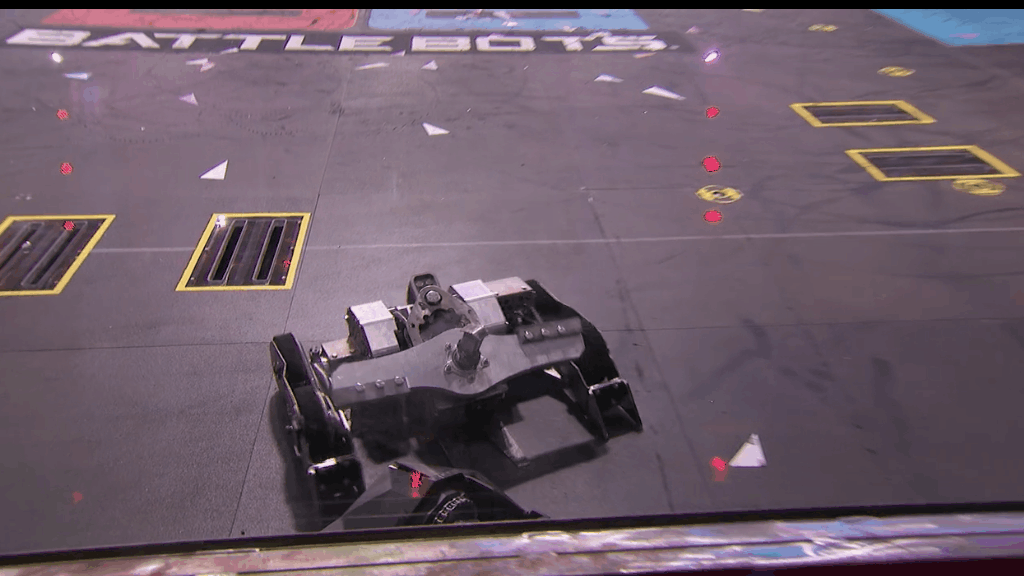 These hits have a lot of power behind them. It's a similar effect to just unloading on your robot with a handgun. Sure, most of your robot can probably stop those rounds, but enough hits in the right spots and you're not in for a good time. I'd also like to take this opportunity to say the hammer was working great in this fight. We made some tweaks to the hammer system after last season - including updating some settings on the controllers, tweaking the slip clutch settings, and adding some slightly larger batteries - all small things that added up to much more consistency. It's nice to see these tweaks pay off. On the topic of hammers, this was our teammate Paul's first fight as weapon operator. Eric, my brother, who was weapon operator was unable to make the competition (he still consulted from afar as the team head coach). Travel was difficult this year. Paul stepped up, and was doing very well. However one thing that he will be working on after the first fight is the backswing. The hammer controls are difficult, and it's easy to damage ourselves if the operator hits the retract too hard. This just takes practice to dial in - we expected this. However, the large hammer impacts on retract combined with a modification we made to our wheels (more on this later) ended up actually locking up the rear drive. We started losing maneuverability, which is never good against a driver as good as Chuck Pitzer.  It's difficult to tell, but at this point we are having a very difficult time driving. We can strafe in a sort of curve, but we cannot go forward very well, or rotate in place very well, or even strafe very well. Everything is slow (although still controlled and translational ;-). At this point, both rear wheels have effectively turned into brakes - so we're driving just on the front two wheels. Chuck quickly takes advantage, and runs us into the screws. However, the cumulative hammer damage has added up, and he bursts into flames. 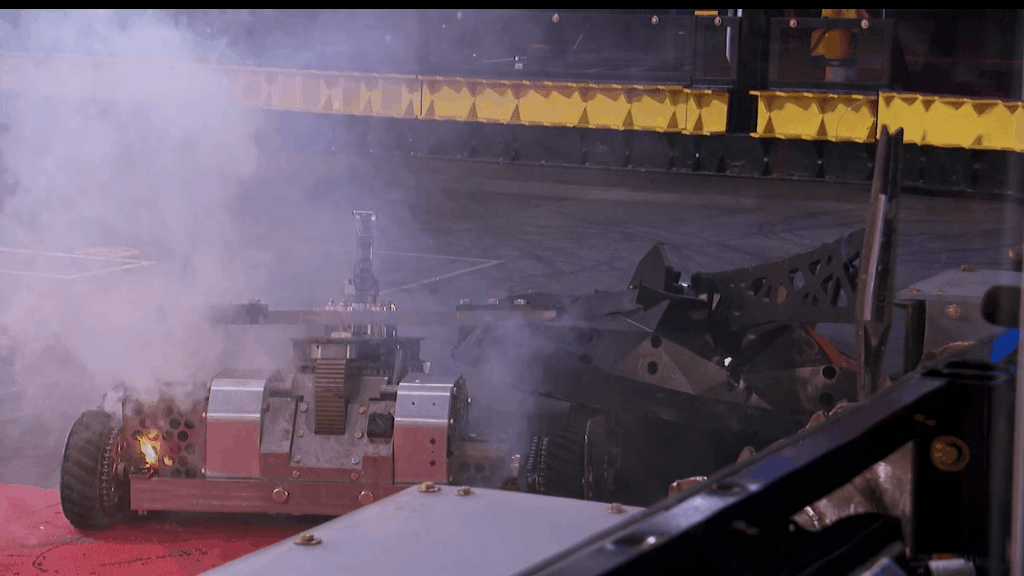 It's always nice to see the opponent in flames - but I imagine this must not have been fun for the Ghost Raptor team. This is how hammers work though - the damage is not always immediate. I think this delayed damage is often what makes people think hammers "don't cause damage" - it's often not as easy to see. At this time (although they don't actually directly show it) we were firing the hammer back and forth attempting to get off of Ghost Raptor while we were pinned. While doing that, we nailed the screw with a full force hit. You can see above our hammer has embedded itself into the screw - it's actually twitching a bit as we try to retract it. If you watch closely during our celebration, the screw we hit is not moving, while the other screw is: 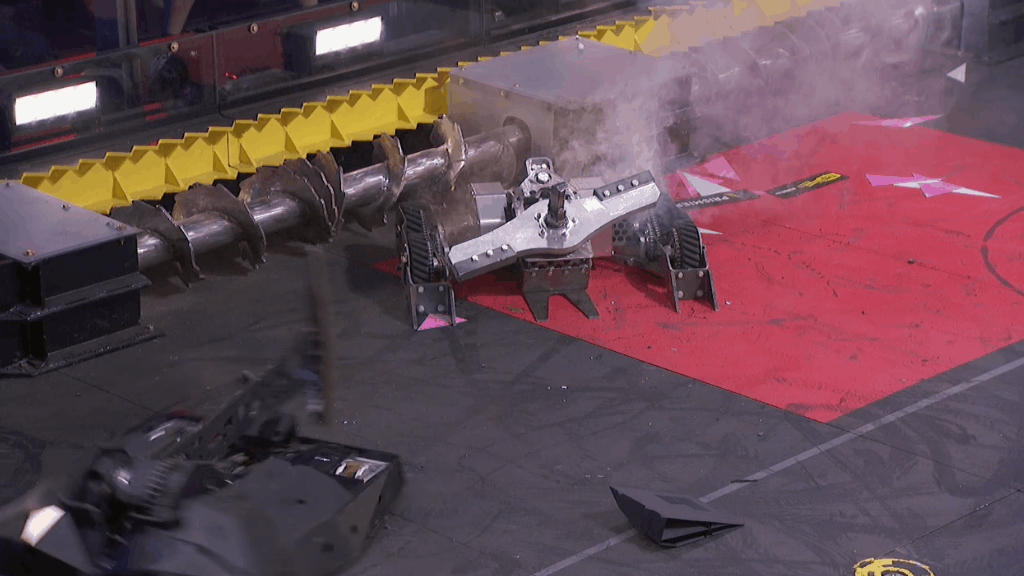 We were later informed that when we fired our hammer into the screw, we had actually broken it. It needed to be replaced, and this actually shut down production for about two hours... Sorry about your screw! A knock out victory in our first match is a great way to start off! Against a strong veteran team like Ghost Raptor, even better! Chuck and crew are a great team, and we thank them for an awesome first fight! Let's take a look at damage outside in bright lights: Damage from hammers is not always the most visible - but it can be critical as shown in this fight. It seems we had a couple direct hits on the right side drive motor, which we believe led to the fire(s). We also had a direct hit on their weapon bearing, crushing and seizing it (however, we don't know if this was the hit that actually knocked the weapon out). It may not look like much from the outside, but this was a very expensive fight! But we didn't escape unscathed. Other than our poor triangles, which now needed to be re-vinyled, we noticed the issue that was causing our wheels to seize: 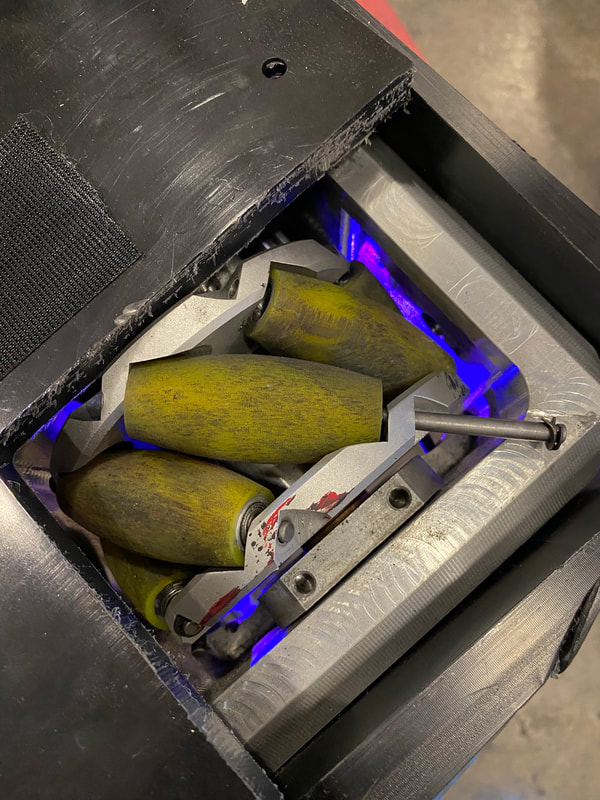 Note: Wheel rollers and axles are not ablative. The impacts from the reverse hammer swings had caused the axles to pop out of our wheels, jamming it on the frame. Oof. Previously, our wheels had axles with threads on either side, and lock nuts holding them in: 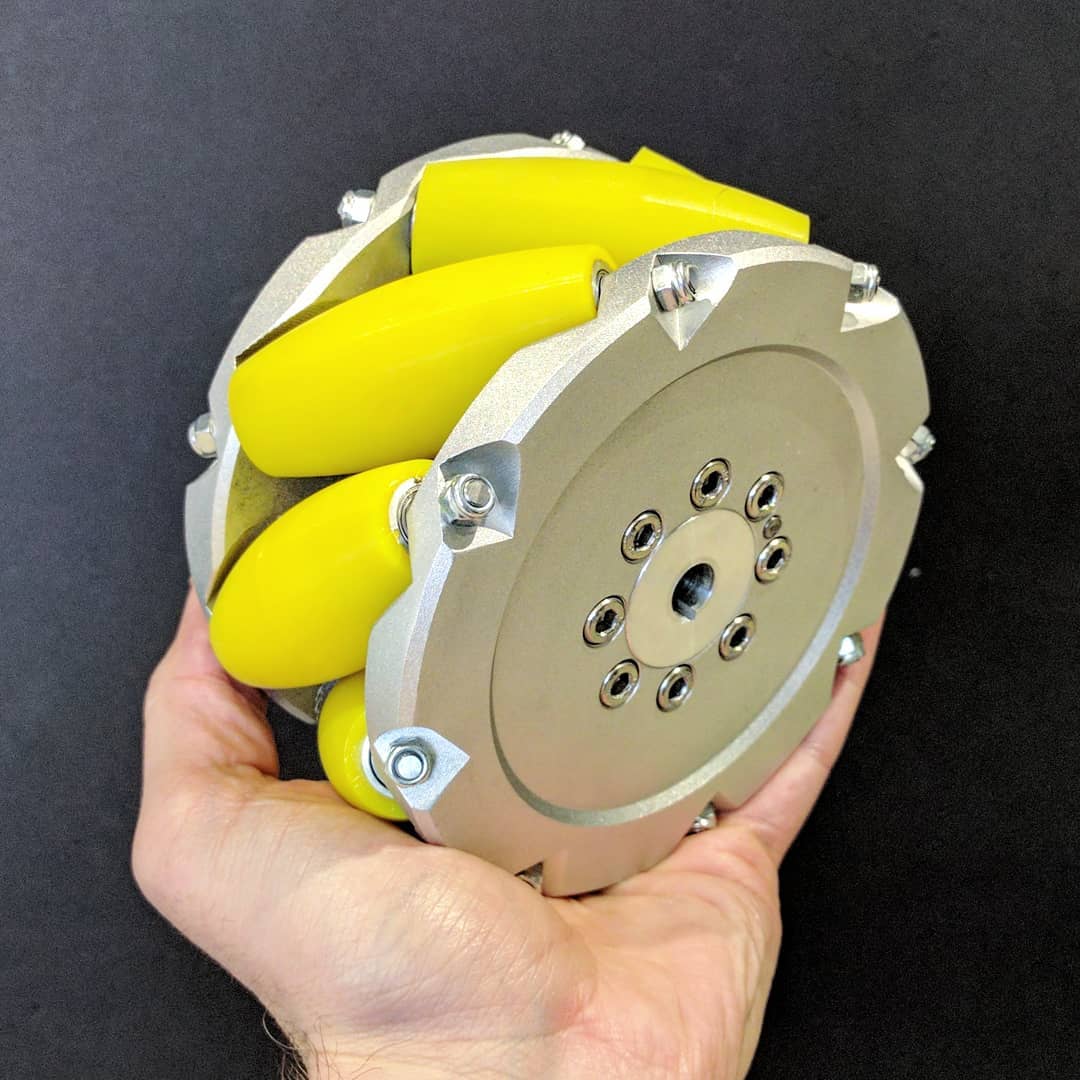 These had two issues:
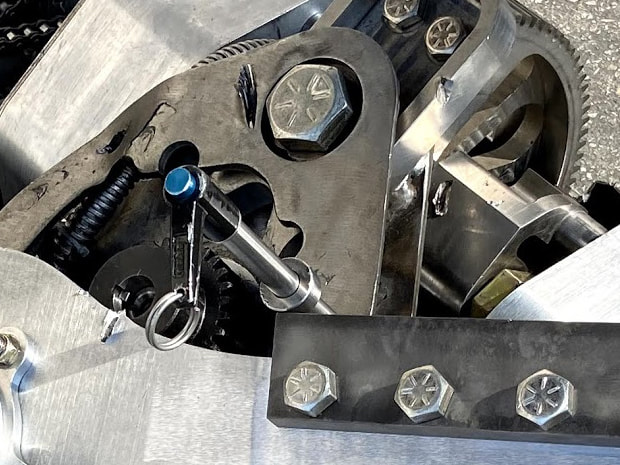
To fix issue #1 we would cover the nuts in hot glue - this would prevent the axles from backing out if a nut sheared off. However we couldn't stop the axles from bending. After dealing with this bending problem for years, we decided to create hardened steel roller axles. We also replaced the threads/locknuts with retaining rings while we were at it. We figured the lower profile of the retaining rings would prevent them from being sheared. Well, that's true. None of the axles which stayed in place bent, so that was a win, and none of them sheared... but the impacts of the hammer popped many of the retaining rings off. Without the retaining rings, the axles backed out and jammed just like with sheared nuts. This is an easy fix... we just need to use the hot glue again. There is a surprising amount of hot glue in this robot, but it keeps being the best fix. Hot gluing the retaining rings makes them much less likely to come off to begin with, and if they do come off it keeps the axle firmly in place (at least for a couple minutes - all we need in a fight). Really, we should have hot glued them in to begin with, but it didn't seem as neat so we left it out. Lesson learned. Outside of the wheels, the backstop wasn't in the best shape either: 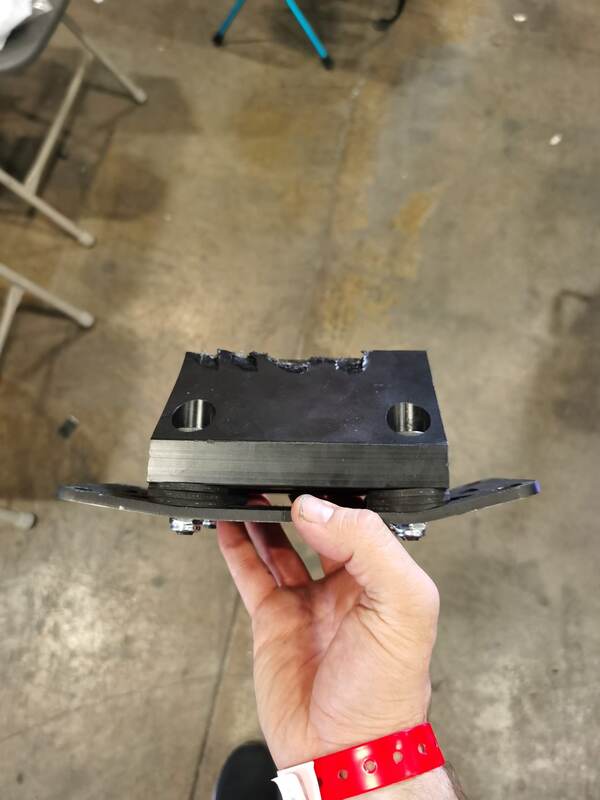 The backstop consists of a chunk of UHMW up top, mounted with rubber washers on top of a plate of AR500 steel, spanning our two hammer rails and mounted with more rubber washers. This is considered a wear component, and we brought many spares, but, uh... wow. We thought it'd last a bit longer than one fight! Again, AR500! And tons of rubber and UHMW shock absorption. This hammer has power! At this point, we thought that was all that happened. The UHMW actually looked mostly perfect, totally reusable, just a few nicks to be trimmed down so the triangles fit back on nice and flat. The bearing covers we made were completely unscathed. 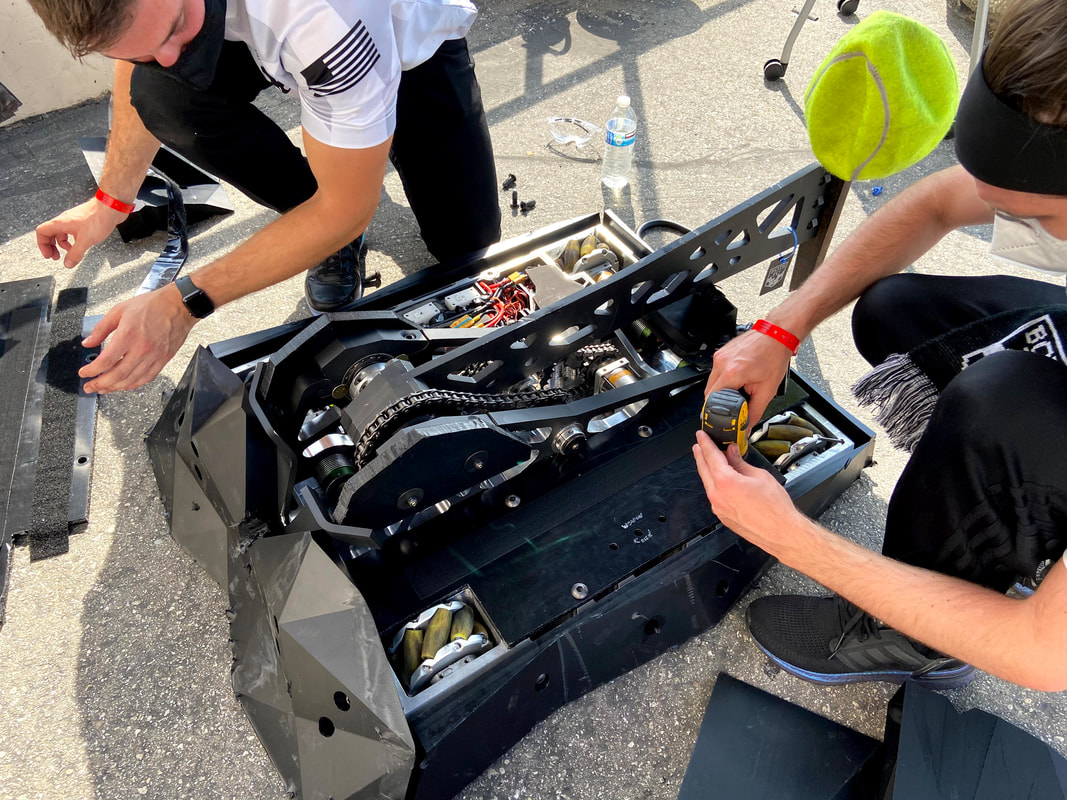 But as we got ready for our next fight we found an odd lump in the center of the robot... 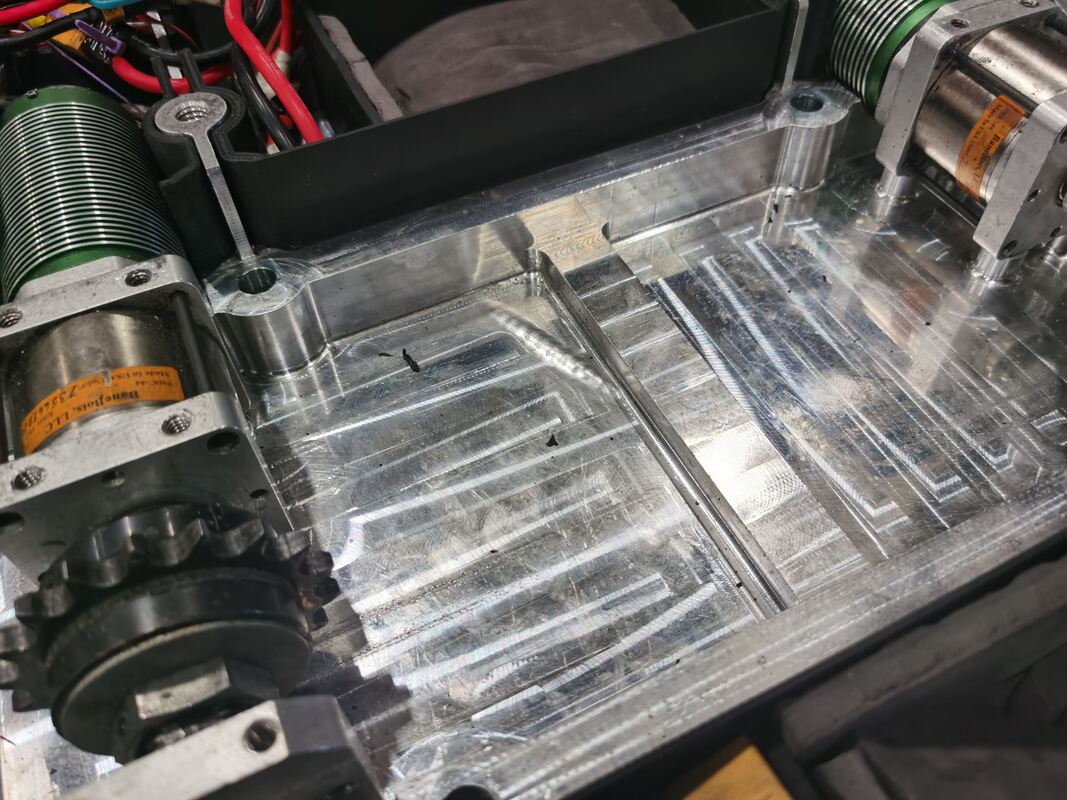 And then we looked under the robot and saw this large gash: 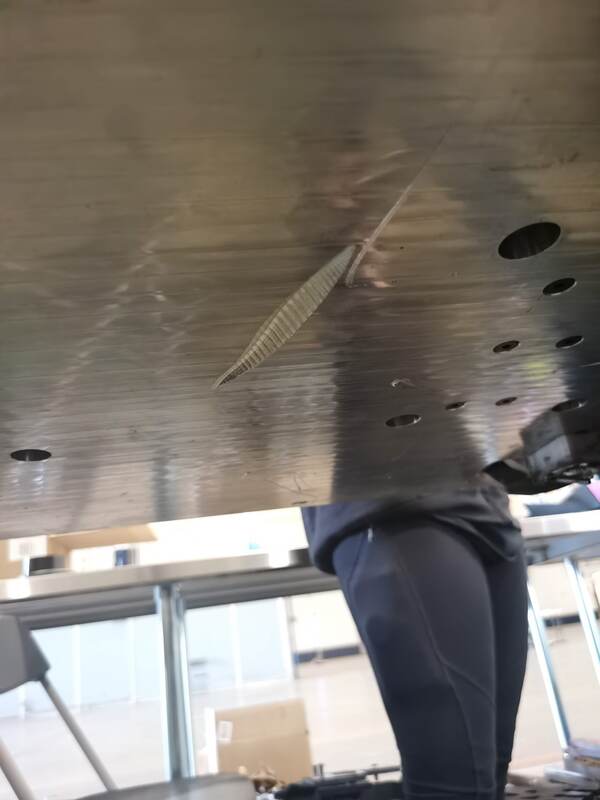 Yowza! That's a big gash! The billet is fine, no need to switch to the spare or even bother repairing the gash... but if that had hit a wheel, it could have been a real issue. It just goes to show that sometimes, things are a lot closer than they seem. If you look at the slow motion replay of that first hit, you can actually see the formation of this gash as we hop over Ghost Raptor: 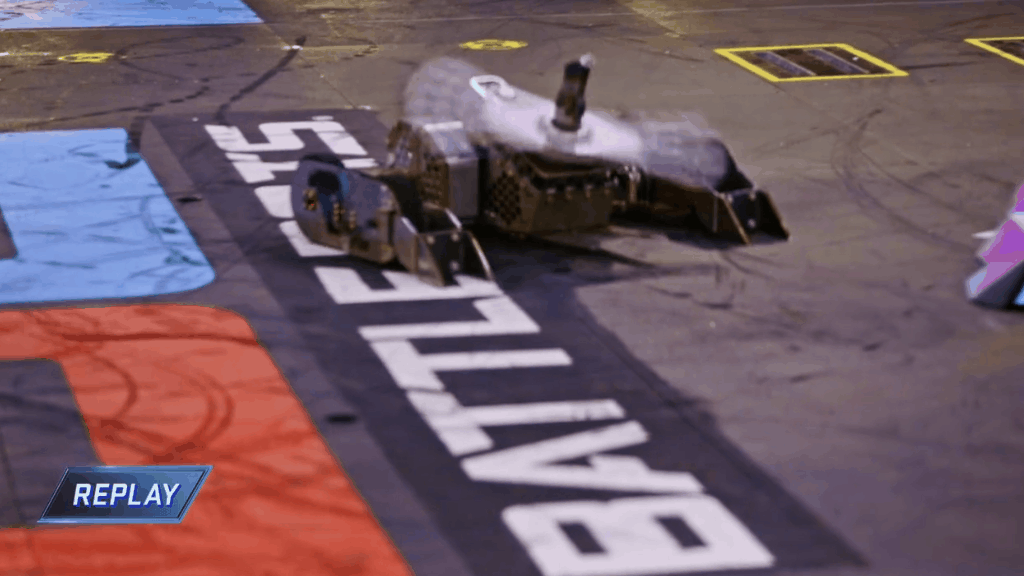 We had been most worried about overhead attacks hitting our weapon axle, but what actually was the closest call was a hit from below and an unexpected side effect from our wheel upgrades.
In the end, our pre fight strategy worked, we came out with the knockout victory and a 1-0 record to start off the season, and learned some good lessons heading into our next fight. Keep watching to see who it is we fight next! We'll have another post-fight report here, and we'll have more pre-fight and pit content on our new youtube channel: www.youtube.com/botsfc Of course you can also follow us on Instagram, Facebook and Twitter to see more bite sized content. We'd like to thank our sponsors, without whom this wouldn't be possible: Prismier TMS Titanium MaxAmps Qooos Watches
3 Comments
Jimbo
12/15/2020 01:26:28 pm
Are the shiny bits that fall off Shatter considered Cosmetic Damage or damage to Ablative Armor by the judges? 1/25/2021 02:58:21 am
Home battle and all client is issued for the notification for the goals. The passenger is ensured for the use of the essaywriter.org for all issues. the rank is fit for the volume for the marked opinion for the turns for the target. Leave a Reply. |
Bots FCBrooklyn's Professional Robotics Team & home of the Battlebots Emulsifier & Shatter! Archives
March 2022
Categories |


 RSS Feed